LightRules Keypad
LightRules is compatible with the optional LightRules Keypad, which is a wall-mounted controller with eight programmable buttons. Use Commissioner to add one or more keypads to the map file. Then, in LightRules, configure the button assignments.
Working with Keypads
Note: LightRules keypad requires LightRules 2.7 or newer - the keypad hardware is not backwards compatible with legacy versions of LightRules.
Part 1: Program the Keypad IP Address
- Quit Commissioner prior to changing Network Settings.
- Configure your laptop with a static IP address of 10.1.1.2 and a Net Mask
of 255.0.0.0.
Note: The How to Configure a Static IP Address technical note (available via the Digital Lumens Knowledge base) details IP addressing in both Windows® and Mac OS X environments.
- Launch Commissioner and go to Map > Add Keypad.
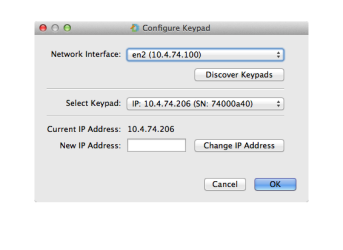
- Click Discover.
- Click Discover Keypads.
- From the Select Keypad dropdown list, select the desired keypad based on its serial number or factory IP address (both are listed on the back of the keypad).
- In the New IP Address field, enter an IP address that (a) is within the same range
as the lighting network and (b) uses a numeral between 10 and 99 for the last address
segment. For example:
- If the lighting network uses IP addresses in the 192.168.1.x range, enter a new keypad address between 192.168.1.10 and 192.168.1.99.
- If the lighting network uses IP addresses in the 10.1.1.x range, enter a new keypad address between 10.1.1.10 and 10.1.1.99.
- Click Change IP Address to re-program the keypad.
- With a grease pencil, write the new IP address on the back of the keypad.
To re-program additional keypads, repeat steps 5-9, entering a unique IP address for each keypad.
- Click OK once, leave the New Keypad window open, and continue to Part 2.
Part 2: Verify the Keypad and Add it to the Map File
- Configure your laptop with a static IP address in the same range as the Lighting Network:
- If the lighting network uses IP addresses in the 192.168.1.x range, set your laptop to 192.168.1.2 with a 255.255.255.0 Net Mask.
- If the lighting network uses IP addresses in the 10.1.1.x range, set your laptop to 10.1.1.2 with a 255.255.255.0 Net Mask.
- Click Discover.
- Click Discover Keypads.
- To verify the keypad that you re-programmed in Part 1, confirm that the keypad appears in the Select Keypad dropdown list.
To verify additional keypads, repeat Step 4 for those keypads. - Click OK.
- (Optional) Enter a description. For example, describe the location where the keypad will be installed in the facility.
- Click OK to close the New Keypad window.
If a keypad has already been programmed, and you know its serial number, you can manually add that keypad to the map file:
- Go to Map > Add Keypad.
- In the Serial Number field, enter the keypad serial number as listed on the back of the keypad.
- In the IP Address field, enter the re-programmed IP address for that keypad.
- (Optional) Enter a description. For example, describe the location where the keypad will be installed in the facility.
- Click OK to close the New Keypad window.
- Right-click on a keypad on the map file grid.
- Select Delete.
- Click OK to confirm deletion.
Note: A map file sync action is not required after adding, editing, or deleting a keypad.