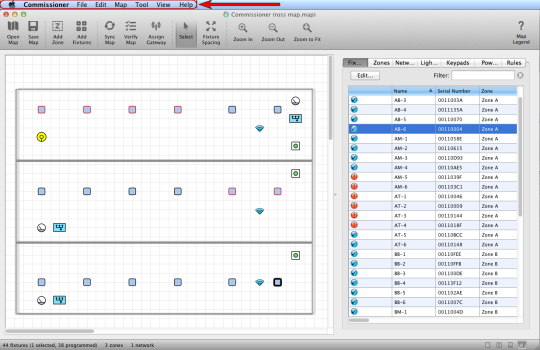
Commissioner Menu
New — Create a new map file.
Open — Open and edit an existing map file.
Tip: When you launch Commissioner, the most recently edited map file loads automatically.
Merge — Merge one map file into another map file.
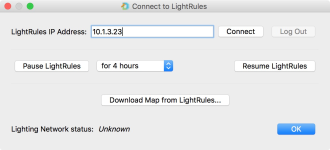
Connect to LightRules (![]() NEW) - Selecting this menu item opens the Connect to LightRules window:
NEW) - Selecting this menu item opens the Connect to LightRules window:
From here you can connect to a LightRules appliance, log out of LightRules, pause LightRules for a specified amount of time, resume LightRules, and download the current LightRules map to Commissioner.
Load Background Image — Load an image of the facility floor plan into the map grid. Commissioner accepts PNG, JPG, and TIFF image files.
Clear Background Image — Remove the facility floor plan image from the map grid.
Import Map Data — Load map data from a CSV file created using spreadsheet software.
Export Fixture Info — Use this option to export a map to CSV file format for editing.
Save — Although Commissioner auto—saves your work, you do have the option to manually save the map file, as desired.
Save As — Save the map under with a new file name and/or save the map in a new location.
Save Map Image — Save a screenshot of the map grid, fixtures, and background image in PNG format.
Save Import Template File — Save a CSV import template file with pre-configured fields for serial number, fixture name, zone, network, and more.
Undo — Undo the last fixture move on the map grid. Commissioner supports unlimited undo actions.
Redo — Revert the undo action.
Edit Fixture — Edit the fixture name, zone, 0—10v profile, and description. Select a coordination master and enable/disable daylight harvesting (if supported).
Blink — "Blink" an installed fixture to visually locate that fixture within the facility.
Tip: Blink is a convenience feature designed to reduce time spent on a lift by wirelessly connecting to fixtures for identification rather than requiring a USB connection.
Calibrate Daylight Harvesting Manually — All fixtures with daylight harvesting capability must be calibrated with Commissioner before daylight harvesting can be used by LightRules (see Manual Calibration for more information).
Calibrate Daylight Harvesting Automatically — All fixtures with daylight harvesting capability must be calibrated with Commissioner before daylight harvesting can be used by LightRules (see Automatic Calibration for more information).
Advanced — Opens the advanced features in the sub—menu:
- Ping Fixture — Determine if the fixture is communicating.
- Read Fixture Info — Display fixture data, including kWh used, active time, inactive time, and more.
- Manual Fixture Control — Demonstrate the fixture dimming level via a slider control.
- Download Fixture Log — Download a log file containing all available fixture information.
- Fixture Command Terminal — This menu item is reserved for Digital Lumens Technical Support.
- Troubleshoot Fixture — Access and view fixture registers via USB cable or USB wireless adapter. This information is used for diagnostics when requested by Digital Lumens technical support.
- Reset Fixture — Clear some or all of the fixture data log and settings.
- Scan for Active Networks — Finds and displays all programmed networks and unprogrammed networks (no lighting gateway assigned).
- Blink Network — "Blink" an entire network of installed fixtures to visually locate those fixtures within the facility.
Update Firmware — Launches the update fixture firmware wizard.
Select All — Select all fixtures and lighting gateways. Selected objects on the map grid display a black border.
Deselect All — Deselect all fixtures.
Select Many — Enter the serial numbers of multiple fixtures you want selected at the same time. Check the Gather Vertically option to line up the selected fixtures in a column, or check Gather Horizontally to line up the fixtures in a row. The Select Many feature is useful when map file data has been imported in auto, but the fixtures have not been placed.
Gather Horizontally — Line up the selected fixtures in a virtual row.
Gather Vertically — Line up the selected fixtures in a virtual column.
Align Left Edges — Aligns the selected fixtures to the left edge of the left—most fixture.
Align Top Edges — Aligns the selected fixtures to the top edge of the top—most fixture.
Delete Delete the selected fixture(s), lighting gateway(s), or zone(s) from the map.
Sync Map — Wirelessly update the fixtures in the facility.
Force Sync Map — Opens a window that lets you sync a single fixture or all fixtures in a network or zone.
Verify Map — Wirelessly compare the settings in the map file to the settings actually in use. If the settings do not match, you should perform a sync action.
Assign Lighting Gateway — Add a lighting gateway to the map file and associate with a unique network ID.
Commission DLAs — Configure DLAs that have been added to the map file. See Commission DLAs for details.
Characterize 0—10v — Runs the 0—10v configuration wizard to set up a 0—10v profile for DLA fixtures with DLA—CA/FA connected.
Add Zone — Add a new zone to the map file. A zone specifies the active power, inactive power, and sensor delay settings for all fixtures in that zone.
Add Fixtures — Add one or more fixtures to the map file. There are three paths for adding a fixture:
- add the fixture via USB cable connection,
- add the fixture through wireless discovery, or
- add the fixture manually by typing the serial number.
Add Fixture Grid — Rapidly add a grid of generic fixtures to the map and then associate with the serial numbers of actual fixtures.
Replace Fixture — Swap one fixture for another, based on serial number. Add the replacement fixture as you would any new fixture (via USB cable connection, wireless discovery, or manual serial number entry).
Add Keypad — Add an optional LightRules Keypad to the map file. See Chapter 8 for configuration details.
Add Power Meter — Add a power meter to the map file. See Chapter 8 for configuration details.
Add Power Gateway — Add a power gateway (required if installing power meters) to the map file. See Chapter 8 for configuration details.
AES Encryption — Add AES Encryption to all networks in an installation. Select this option to encrypt the wireless network and minimize security vulnerabilities. Changing the AES Encryption state requires synchronization of the entire installation. Older ILE fixtures may not support encryption. An error will display if this is the case.
Site Configuration — Input facility information including enterprise IP address, and SMTP email settings.
Map Info — The first time a user launches Commissioner, that user is prompted to register/enter his or her name, email address, and phone number. Then, every time a map file is saved, that map file is associated with the registered user. Select Map Info to display the registered user associated with the currently open map file. Note that if you save the map file, your info will be associated with the map file.
Select — Indicates the "Select" map object tool is active (instead of the "Adjust Fixture Spacing" tool).
Adjust Fixture Spacing — After selecting multiple fixtures, click—and—drag to adjust the spacing between each fixture. This is especially effective if you've already created a fixture grid.
Hide Toolbar — Toggle the toolbar on and off.
Tip: There are keyboard shortcuts (see Appendix C) for all toolbar actions. Also, the right—click menu contains many of the toolbar actions. Hiding the toolbar can be useful if you are working from a laptop with a small screen.
Toolbar — Customize the toolbar display only icons, only text, or icons and text.
Map Only View — Hide the data view (fixtures tab, zones tab, networks tab, etc.).
Data Only — Hide map.
Top and Bottom View — Show map above data view.
Side by Side View — Return to the default view from map only view, data only view, or top and bottom view.
Show Serial Numbers — Display the last four digits of each object's serial number in the map grid. Use this function in conjunction with the Save Map Image function to create a sticker book.
Show Names (![]() NEW) — Display the object's name in the map grid. Use this function in conjunction with the Save Map Image function to create a sticker book.
NEW) — Display the object's name in the map grid. Use this function in conjunction with the Save Map Image function to create a sticker book.
Data View — Toggle through the tabs in the data view.
Zoom — Change the zoom level, as desired. The Zoom to Fit option, which fits the map in the map view.
Snap to Grid — Automatically aligns all fixtures with the vertices in the map grid.
Show Grid — Toggle the map view grid on and off.
Set Background Scale — If you have loaded a floor plan and the scale is incorrect, adjust it using the background image scale slider.
Set Background Transparency — Use the background image transparency slider if the floor plan image has an opaque background and you want to see the grid, or if the floor plan is complex and you want to dial back its visibility.
Map Legend — Display a guide explaining the meaning of the fixture status icons.
Search — Search the Commissioner menu system.
Commissioner Admin Guide — Open Commissioner online help at https://commissioner.digitallumens.
Release Notes — Overview of bug fixes and new features for latest releases.
Register Commissioner — Edit the name, phone number, and email address associated with Commissioner. The information entered here is associated with the map file each time you save, and you can view the current information by selecting Map Info from the Map menu.
Check for Updates — If connected to the Internet, verify that you are using the latest version of Commissioner software. When a new version is available, you have the option to download that version. Note that you do not have to uninstall older versions of Commissioner in order for the new version to install properly.
Switch to Tabletop Demo / Commissioner - Switch applications.
