Coordinated Control Setup
Coordinated control enables all fixtures in a zone to be triggered by the occupancy sensor of a single fixture or multiple fixtures.
Enable Coordinated Control at the Zone Level
To enable coordinated control, you must first enable it at the zone level.
- Double-click on a zone listed under the zones tab.
- Check Coordination enabled to activate coordinated control.
- Click OK.
- Click Sync Map and run the sync wizard to send the new zone settings out to the affected fixtures.
Assign One or More Configuration Masters
With coordinated control enabled at the zone level, you can edit a fixture and assign that fixture as a coordination master. The coordination master triggers the entire zone to turn ON when occupancy is detected.
- Double-click on a fixture listed under the fixtures tab.
- If coordinated control is enabled for the fixture's zone, the Coordination master checkbox will be available. Check Coordination master.
- Click OK.
- Repeat steps 1-3 for all fixtures in that you wish to be coordination masters.
- Click Sync Map and run the sync wizard.
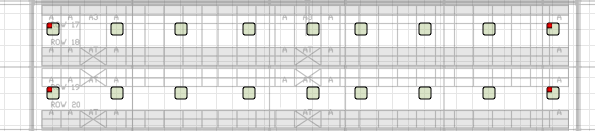
 In the map grid, a red box within a fixture icon indicates that the fixture is a coordination master.
Example
In a racked aisle environment, you can activate the lighting in a single aisle via the fixtures at either end of that aisle. In this scenario, if either of the end fixtures (the coordination masters) detect a person or machine entering the aisle, then all of the fixtures turn ON in unison. Once ON, the fixtures then use their own settings until switching back to inactive mode.